
Hello all! I’m going to provide you with a breakdown of how I travel! I try to be as cost effective and budget friendly as possible when I travel, so I hope to offer some knowledge on it.
Note: Due to the COVID-19 pandemic I strongly encourage all travelers to get vaccinated if they have not already, health conditions permitting. It makes traveling outside of the country very simple, and you don’t have to worry about perfectly timing a negative COVID test right before you leave (for some countries). Other countries still require a COVID test before arriving, but many do not. Returning to the United States however, you will be required to prove a negative PCR test to re-enter, so plan accordingly.
With that being said, let’s get started!
STEP 1: MONEY
The more foresight you have about your trip, the better. I know some trips are more impromptu which can be some of the best trips ever, but let’s pretend we’re all beginners and want to plan plan plan.
I strongly suggest getting a travel credit card. I personally use Capital One’s VentureOne credit card (I don’t like annual fees). Sign up bonus points can almost single handedly send you off on your first trip by plane or booking a handful of hotels without spending money, it’s great. Other great cards that I know of are Bank of America’s Travel Awards credit card and Chase’s Sapphire Preferred credit card.
The general benefit of paying with a travel credit card is that you can pay for your stay and flights well in advance and pay them down by the time you fly out, and the points you accumulate on your trip can often pay down some of your meals and experiences!
For budgeting, it also helps to have an idea of where you’re going. If you’re going to Western Europe, landing in a handful of major cities will save you some money (like London, Paris, Lisbon, Barcelona, Rome, Reykjavík, Amsterdam, etc). Western Europe in general can be a little expensive, so not too different from an American big city. Eastern Europe however can be quite a bit cheaper. My last trip to Croatia cost a good bit less than my time in Rome, for example.
Now I can’t speak to Asia as a continent because I haven’t been yet, but I know that the flights are generally expensive, but many of the countries are crazy cheap to us, except for maybe Japan, Hong Kong, and Singapore.
My brief stint in Morocco (Africa) was quite affordable as well, however I was flying from mainland Europe so that made flights quick and cheap.
Australia and New Zealand are both expensive to fly to and expensive to be in, so I’ve been told.
Central and South America are generally very affordable to fly to and don’t cost a lot once you’re there, yay!
STEP 2: FLIGHTS
I am a very frequent user of Google Flights, like checking every other week just to see what’s out there. There’s also a tracking capability for flights that’ll alert you of flight price increases or decreases by the date. If you’ve never used Google Flights before, it looks a little like this:
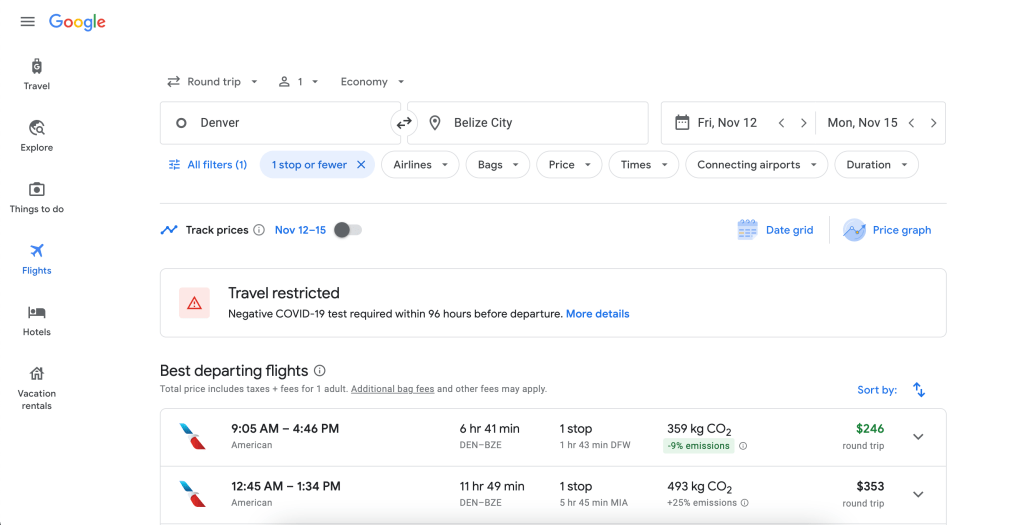
For example, real quick I said I wanted to go on a 4 day trip to Belize sometime in November because I think the weather would be nice and not too hot, and because I love scuba diving. You simply type the city you want to fly out of, the city you want to fly to, and your dates; then you can add other filters like airlines, how many people are traveling, how many stops (!!!), if you want to check a bag, and so on.
There’s also the Explore tab on Google Flights which is fun to play with. You can say you want to take a week long trip, filter by your price range, and see where it takes you! You never know, maybe you can spend a week in the Maldives for $1,000.
For international travel, if you’re spry and capable, I highly suggest avoid checking bags if possible. If you’re comfortable carrying everything on your back you should, because any chance of checked bags going missing can throw a loop through your entire journey and you’ll be stressed when you should be having fun.
If you cannot or do not want to carry all your belongings on your back, I understand. In that case I would recommend at least bringing one day’s worth of clothing in your carry on JUST IN CASE.
STEP 3: PLACES TO STAY
Airbnb used to be the best a few years ago, but these days the cleaning and service fees can be outrageous, so it’s back to hotels for me! I am a huge fan of Booking.com and its free Genius Loyalty Program. See some of the perks below:
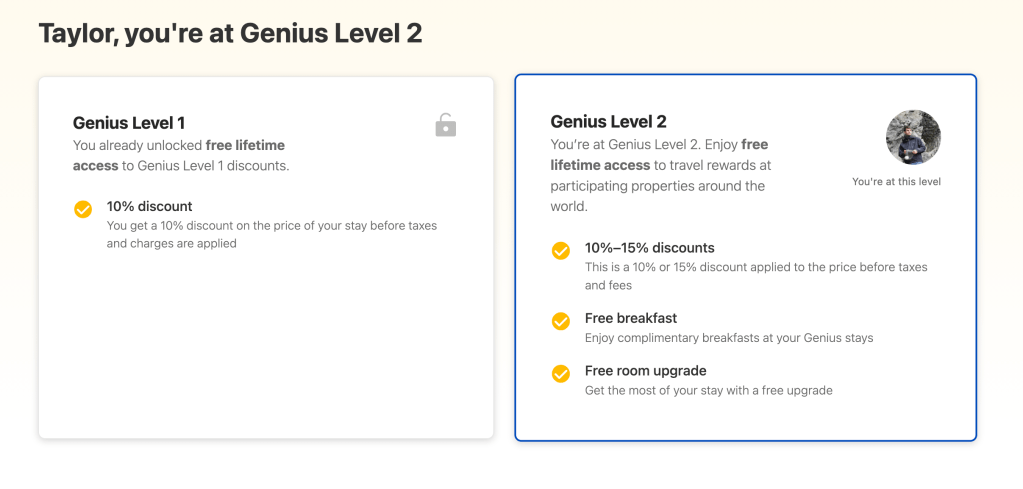
Once you’ve booked 5 stays within 2 years with Booking, you get to Genius Level 2 and get a few perks, it’s super simple.
For continuity sake, I decided to keep Belize City and the November dates for a trip example. I recommend viewing the “Show on map” feature whenever you’re booking a stay somewhere so that you see roughly how far away you are from places you want to visit. If you plan on being on foot a lot, this is a blessing.
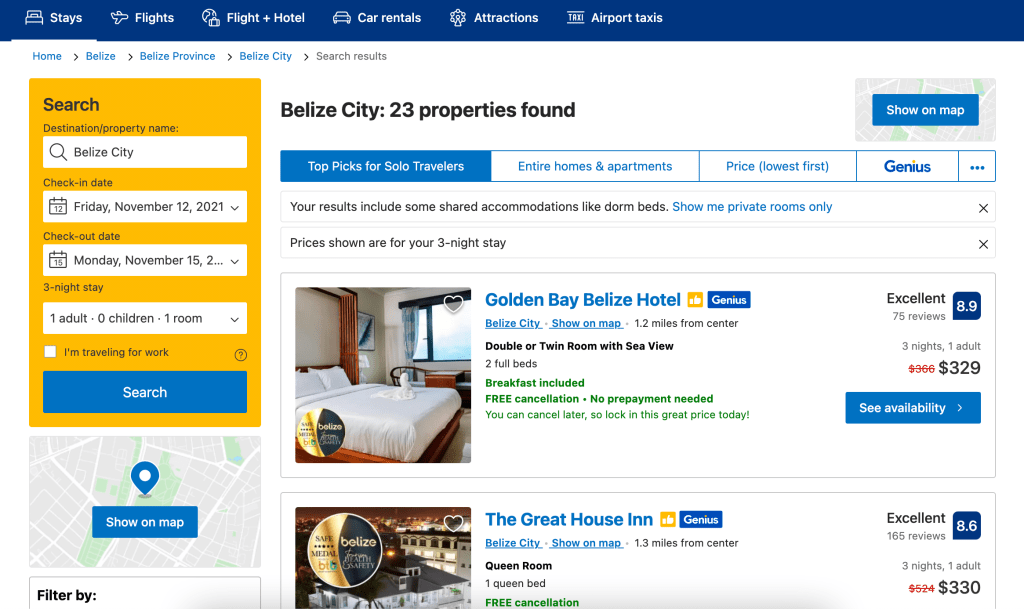
Prices on Booking are generally very great, and if a free breakfast is included, you can bet I’ll be favoring that hotel.
Tip: If you’ve rented a car, be sure to filter that your hotel has on-site parking.
STEP 4: TRANSPORTATION
I’ll keep this section brief. Renting a car to drive is great for road trip type of adventures. I’ve rented cars in Iceland and Croatia and for the most part it worked out well. I’ll provide general advice here.
If you’re renting a car, make absolute sure that you recognize the company, or if you don’t, heavily vet them yourself by looking at reviews. Companies like Hertz, National, Budget, Avis, etc are going to be safer to book with. You may see other companies that say the type of car you want to rent will be hundreds of dollars cheaper! Do not fall for it. They will add all kinds of fees and stuff and try to convince you to buy extra insurances upon pickup, it’s sketchy.
Note: You will almost NEVER get the car you actually choose, but something similar. Also, always be thorough with checking for dents and scratches on the vehicle, and make sure the gas tank is filled when you receive it.
For other types of transportation, it completely depends on where you’re going. Well developed countries will have trains, trams, underground rails, and buses. These are all great and usually cheap. Less developed countries you may want to rely on a car or buses, if you’re lucky (or unlucky) you’ll see some livestock on your bus!
STEP 5: PACKING
I’m sure you don’t need to be told how to pack, so instead I’ll just show you the backpacks I use. If you’re backpacking a trip without a checked bag, you’re going to be confined to certain sizes of bags you can travel with, especially on smaller airlines. Dimensions of backpacks for carry on are actually important, who knew?
I have used both the Osprey Porter Travel Pack 46 and the Thule Landmark 60L.
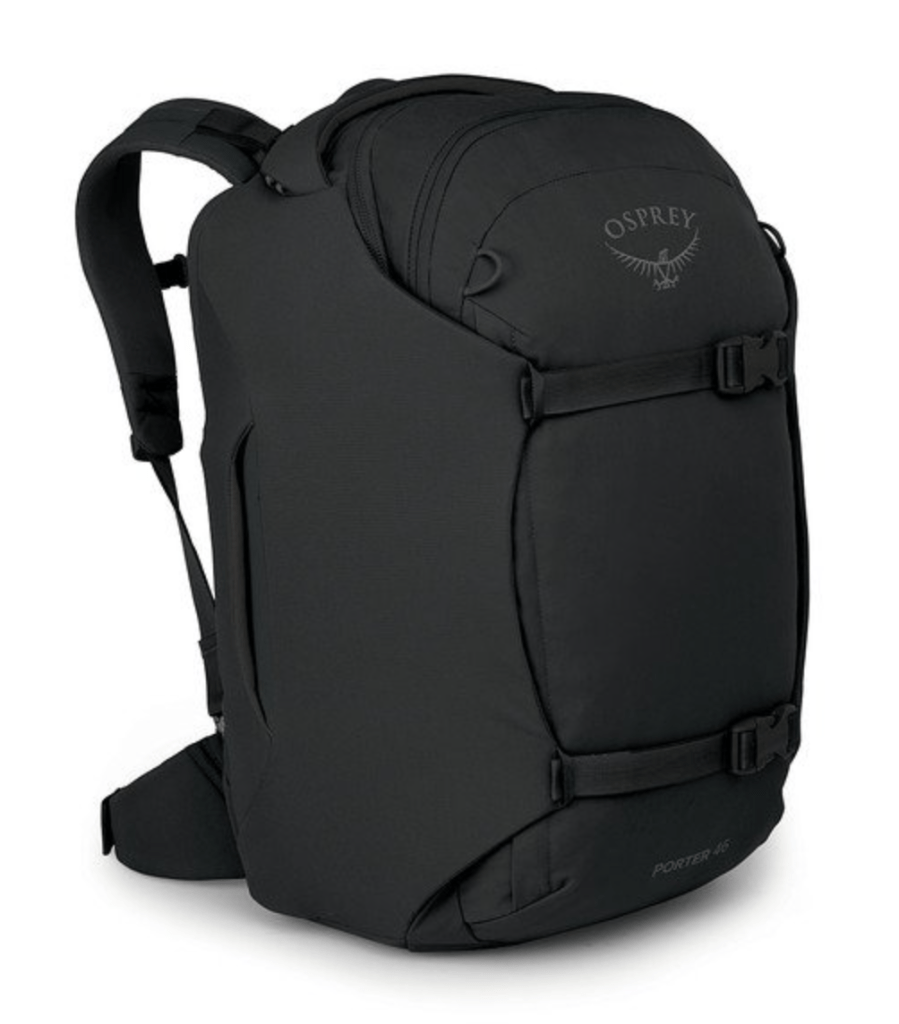

The benefit of this Osprey pack is that it’s essentially a bucket with straps. There’s a laptop sleeve, a handful of solid compartments, and there’s the tightening straps on the outside to make it as compact as possible. It’s very easy to roll up all of your clothes and pack with this backpack.
The benefit of this Thule pack however, I think serves one a bit better if you’re carrying any kind of gear. You’ll notice that it’s actually 2 bags in 1. The smaller bag, the daypack, is great for carrying a laptop (there’s a small sleeve), camera gear, bottles of water, souvenirs, etc. It’s lightweight and great to carry around as you’re exploring. The whole pack is advertised as a 60 liter bag, really it’s a 45 liter main pack (so, close to the 46 liter Osprey pack) and the daypack is the extra 15 liters. Overall a great pack for both clothes and miscellaneous gear.
Tip: If you’re traveling somewhere where the tap water is questionable, or you’re going to camp, you should probably buy yourself a LifeStraw to drink water and some accessories if that’s your thing.
STEP 6: LAST MINUTE THINGS
A general thing I do that I’m not sure many others do, is download a Google Maps of where you’re going on your phone. You will need to download the Google Maps app. Trust me, it’s better than the iPhone maps. The point of downloading a map is that you can use it when signal is sparse or your phone will be on airplane mode the entire time. Once a map is downloaded, it’ll search whatever you need it to in the area when you’re abroad without signal. The app won’t necessarily navigate for you unfortunately, but it’ll point you in the direction of where you need to go if you’re walking.
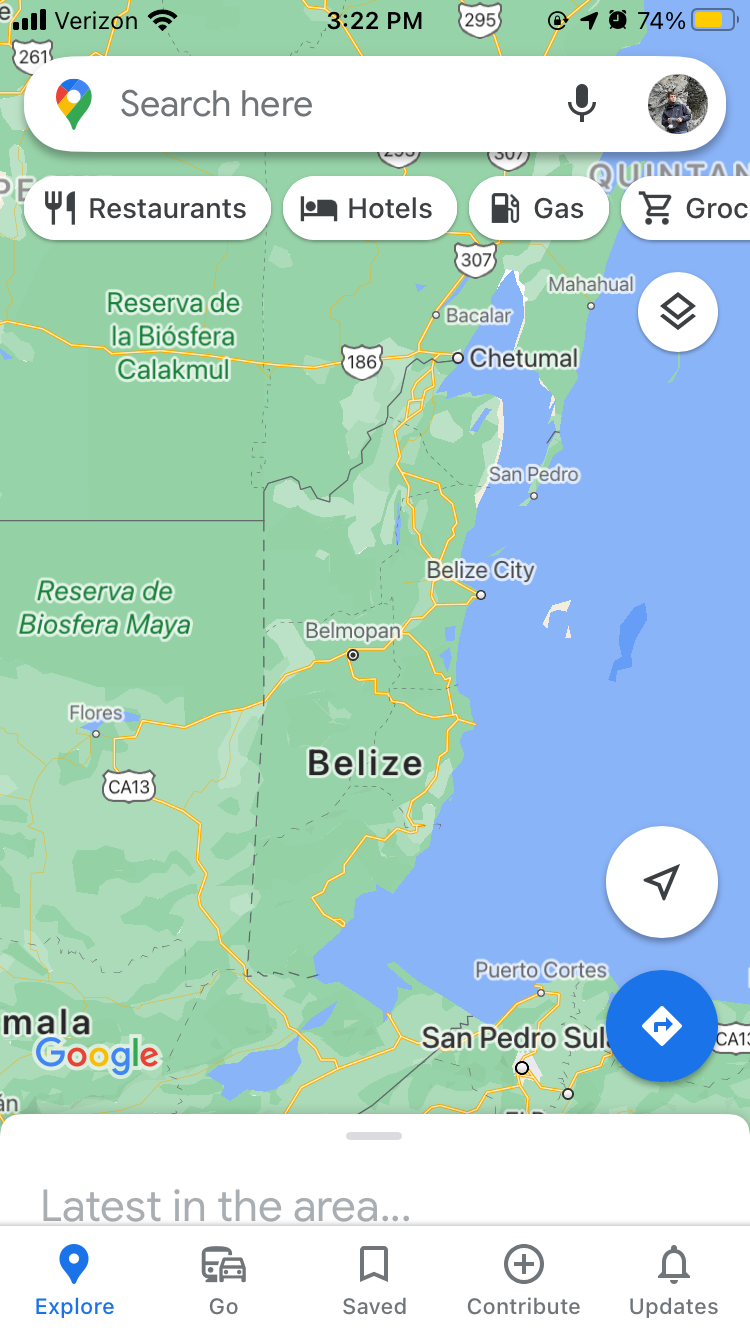
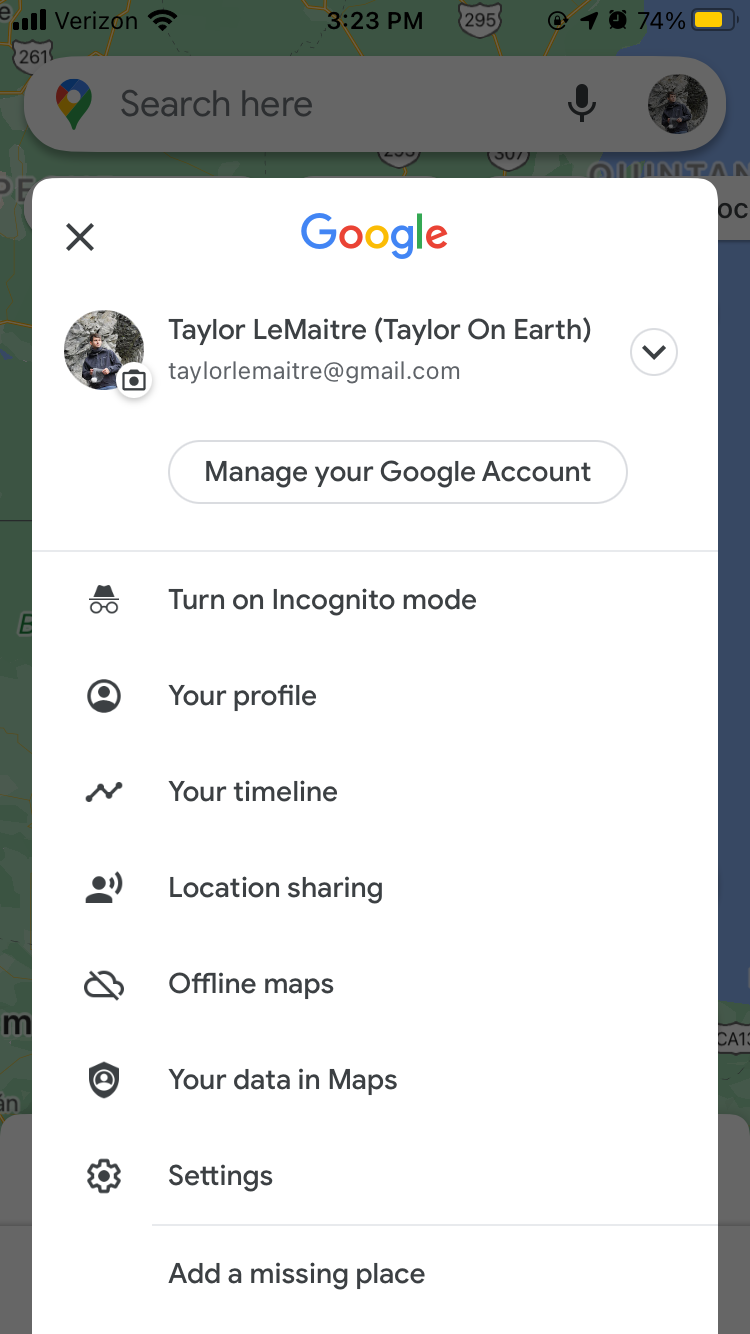
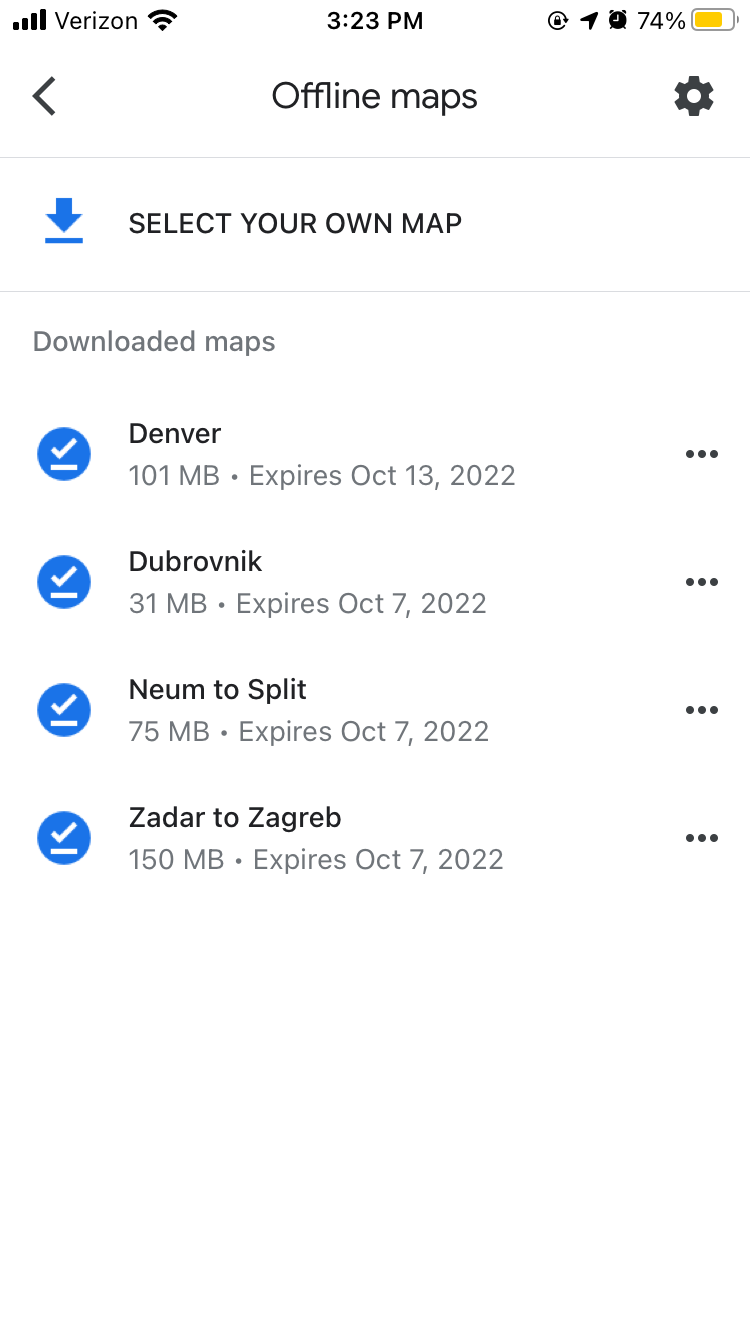
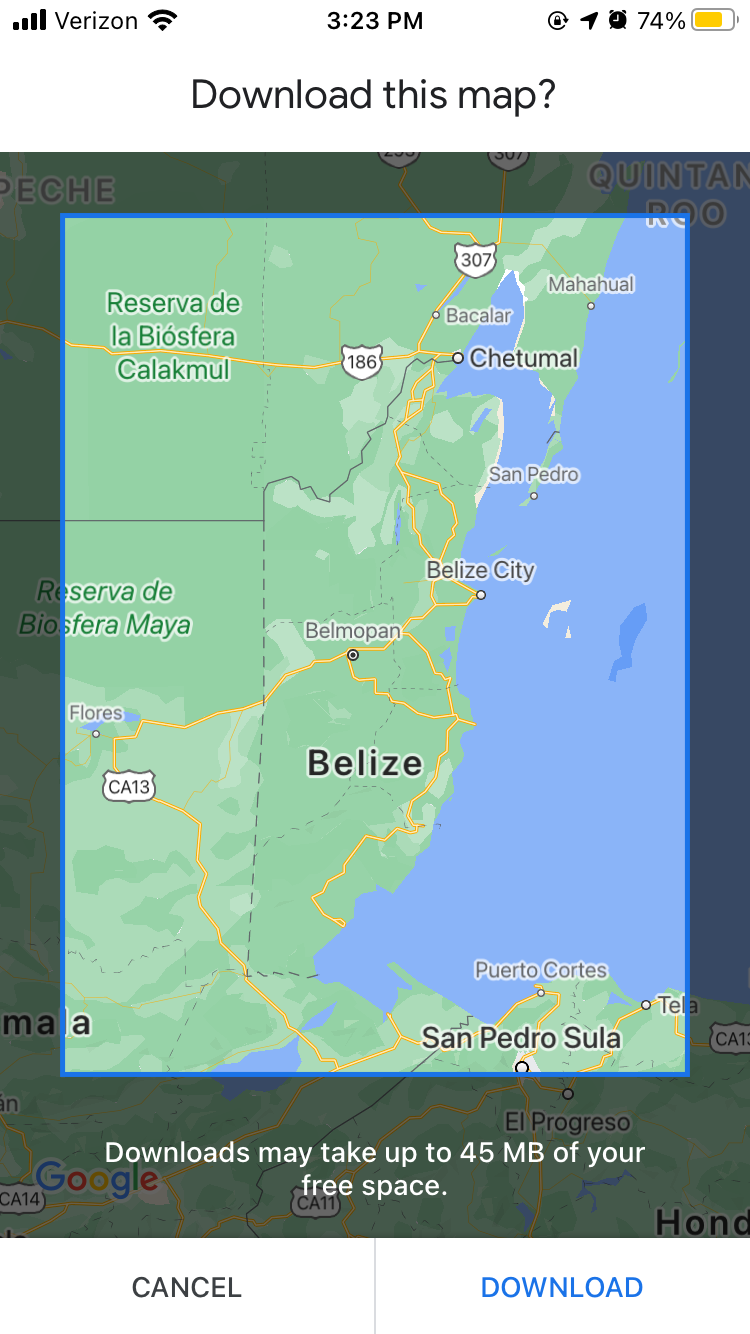
Once you have the Google Maps app downloaded, you can get started. First, search wherever in the world you wish to go! Then, in the top right corner of the screen you’ll see your Google icon next to the microphone icon, tap it. Next, you’ll tap on the Offline maps button. Lastly, you will tap “select your own map” at the top of the screen and size the square on the map of where you want to go so that it fits your location, then click download in the bottom right corner and you’re done!
When you’re traveling, often times cafes and restaurants will have Wi-Fi so you can post pictures to social media, text your friends and family, and you can actually navigate with Google Maps so when you leave the cafe or restaurant, you have a better sense of direction. Wi-Fi quality abroad is generally not as good as it is in the United States, FYI.
It’s always good to have your passport and vaccine card handy when at the airport, so keep those easily accessible, but you already knew that. Go out and see the world!

Leave a reply to Vicki Harris Cancel reply